TOPIC 3: MEASUREMENT
Concepts of Measurement
The Concepts of Measurement
Explain the concepts of measurement
Measurement is the process of assigning numbers to observations or events. It is the process in which the amount of values, data or quantity is obtained. Measurement is an important activity in physics. During measurement, a scientist follows the proper procedures uses proper instruments so as to get exact amounts.
Importance of Measurement in Real Life
State the importance of measurement in real life
Measurement is among very important practices in several fields such as engineering, medicine, architecture, teaching, communication, transport and many more. It plays a great role in our daily life. Without measurement people could not be able to do things. Some of the importance of measurement can be seen in the following aspects;
1.Determination of time – Time helps us to plan our daily activities. Time can be measured in seconds, minutes, hours, days, years and so on. Time helps to know our age as well as historical events. It also helps us to control the occurrence of events e.g time for a chemical reaction to take place, laboratory practices, when to plant crops and harvesting and so on.
2.Determination of amount of quantities – It is important that we know the amount of food we want to buy or cook, the amount of water we want to use, amount of fruits we want to eat, size of shoes and clothing, size of house we want to live in and so on. Amount of quantities can be mass, volume or length.
3.Designing of equipment and materials – Materials and things like clothes, shoes, chairs, tables, television sets, computers, houses, cars, laboratory apparatus, airplanes, windows, mobile phones require the knowledge of measurement so as to make them meet the needs of the users.
4. Medical services – Doctors needs to know how much a patient is affected by a disease. Doctors will also want to give proper amount of medicine to cure the patient. All these activities require the doctor do some measurements.
5.Predicting weather conditions – Weather conditions help in planning for economic and transport activities as well as determination of climate of a place. People need to know if it will rain, amount of temperature of the day, humidity as well as wind speed and direction.
6. Understanding weight -Is that object too heavy to pick up by yourself or do you need to use something to lift it? Some may think this is not important but it is pretty easy to hurt yourself if you lift objects that are too heavy.
7. Transportation -How much weight is too much for a plane to take off or a car to move efficiently? How much fuel is needed to reach a certain point and how long will it take to get somewhere? Yes, measurements play a significant part in transportation.
Therefore, life could very hard and unpredictable without the knowledge and use of measurement in our daily life.
Basic Fundamental Quantities
A Fundamental Quantity
Define a fundamental quantity
A quantity is the amount, size or extent of the material, object or event expressed in numbers. Examples of quantities are mass, speed, distance, force, energy and many more. A quantity has two parts, a number and a unit e.g. A mass of 12 kg has ‘12’ as a number and ‘kg’ as a unit.
A Unit is the standard which is used to explain measurement of a body like; kilogram, metre, seconds etc.
A quantity may be fundamental or derived. A fundamental quantity is the quantity which cannot be explained in form of other quantities. There are seven fundamental physical quantities namely mass, length, time, temperature, electric current, amount of substance and luminous intensity. Fundamental quantities cannot be derived into other quantities.
Three Basic Fundamental Quantities of Measurement
Mention three basic fundamental quantities of measurement
Among the seven fundamental physical quantities, there are three basic fundamental quantities which are mass, length and time.
Mass is defined as the amount of matter contained in a body. Length is the distance between two points or objects, while, time can be defined as the gap or space between events.
The S.I Unit of Fundamental Quantity
State the S.I unit of fundamental quantities
SI unit (International system of units): Is the system of units which is used internationally to measure three basic physical quantities.
SI units of fundamental quantities
| Fundamental quantity | SI unit | Unit symbol | Other common units |
| Mass | Kilogram | kg | Tones (t), gram (g) |
| Length | Metre | m | Kilometre (km), centimetre (cm), millimetre (mm) |
| Time | Second | s | Hours (hr), minutes (min) |
| Temperature | Kelvin | K | Centigrade degrees (), Fahrenheit degrees () |
| Luminous intensity | Candela | cd | Candle power |
| Amount of substance | Mole | mol | Pound mole (lb-mol) |
| Electric current | Ampere | A | No other units |
Note: With the exception of temperature, amount of substance and luminous intensity. Other units of measurement that are smaller or larger than the most commonly used units are expressed by attaching a prefix to the most commonly used units.
Greater than 1 unit
- Giga(G) = 1,000,000,000 (10ˆ9)
- Mega(M) = 1,000,000 (10ˆ6)
- Kilo(K) = 1,000(10ˆ3)
- Hector (h) = 100(10ˆ2)
- Decca(da) = 10(10ˆ1)1
Less than 1 unit
- Deci (d) = 1/10 (10ˆ-1)
- Cent (c) = 1/100(10ˆ-2)
- Mill (m) = 1/1000 (10ˆ-3)
- Micro(μ) = 1/1,000,000(10ˆ-6)
Appropriate Instruments for Measuring Fundamental Quantities
Use appropriate instruments for measuring fundamental quantities
Measurement of length
Length is the distance between two points, objects or space.The SI unit of length is meter(m). Other commonly used units are kilometer(km) and centimeter(cm).In the laboratory, length is measured by using instruments such as meter rule, vernier caliper and micrometer screw gauge.
Meter rule
It measures length to the accuracy of 0.001 m or 0.1 cm. It is calibrated from 1 cm to 100 cm which is equal to 1m length. It is used to measure linear length (lengths with no curves).
How it works
- Align a meter rule close and along the edge of the length of the object to be measured.
- Take the reading by looking at the mark from vertically upwards to avoid parallax errors.
- Record the reading.
Vernier caliper
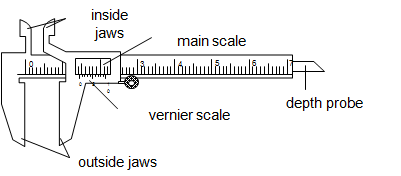
It measures length to the accuracy of 0.01cm (0.1mm). It is used to measure lengths to the range of 1.0cm to about 12.0cm. It has two scales namely main scale and vernier scale. The main scale is marked in cm from 1 cm to 12 cm while the vernier scale is marked with 10 marks measured in mm. It has two outside jaws used to measure length and external diameter of cylinders and pipes. It has two internal jaws for measuring internal diameter of cylinders and pipes.
The inside jaws are used to measure the inside diameter while the outside jaws are used to measure outside diameter.The vernier slides over the main scale.
How to read
- Fit the object to be measured between the jaws, make sure not to press the object.
- Record the reading on the main scale by reading the mark which is just behind the zero mark of the vernier scale.
- Record the reading on the vernier scale by reading the mark which coincides with the mark on the main scale.
- The length of the object is obtained by adding the reading from the main scale and the reading on the vernier scale.
Micrometer screw gauge
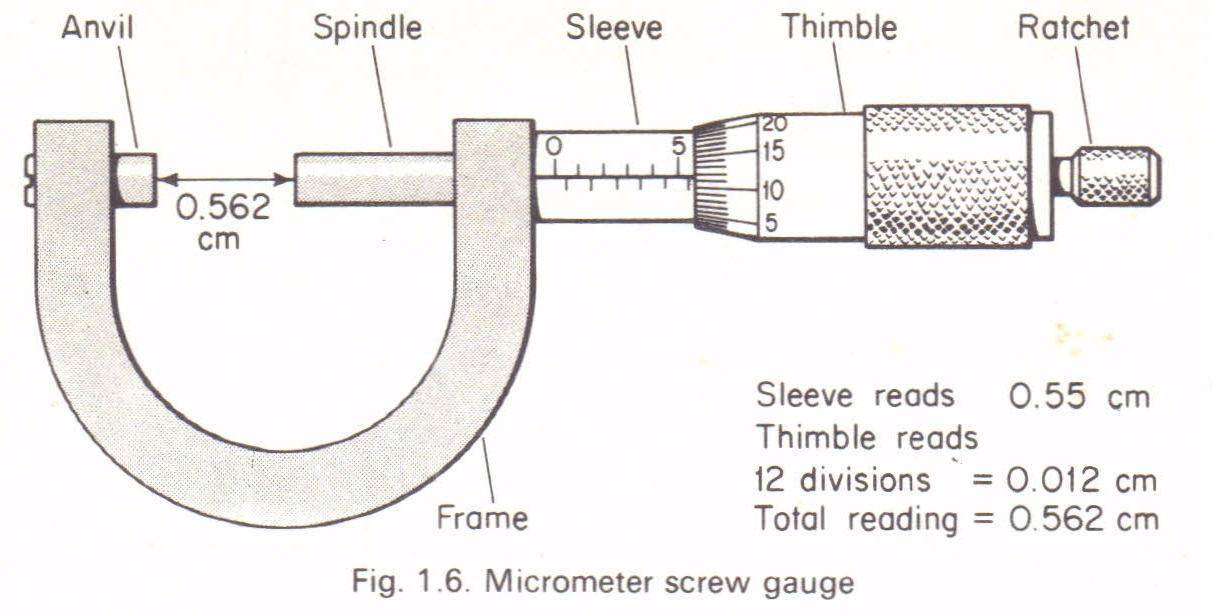
It measures small lengths to the accuracy of 0.001cm (0.01mm). It is used to measure the diameter of wires and ball bearings. It can measure small lengths up to about 2.5cm. It has a spindle with a linear scale on one of its side. It has a vernier scale (circular scale) on its thimble. The vernier scale has 50 equal marks each measuring 0.5mm.
How to read a micrometer screw gauge:
- After fitting the object between the anvil and spindle, take the reading on the linear scale by recording the last mark visible. The reading is in mm.
- Record the reading if there is a mark below the datum line or reference line.
- Take the reading on the vernier scale by recording the mark which coincides with the datum line of the sleeve in mm.
- The length/diameter of the object in mm is obtained by adding the two readings.
Precautions when using a micrometer screw gauge.
- Before use,the faces of anvil and spindle should be wiped clean to remove any dirty particle which would give false readings.
- Check and record for zero error then + or –the correction to the final answer.
Time
Is the gap between two occasions or events.The SI unit of time second(s). Other units used are minutes (min), hour(h),day etc.
1min = 60s
1h = 3600s
1day = 86400s
The instruments for measuring time are clocks and watches.
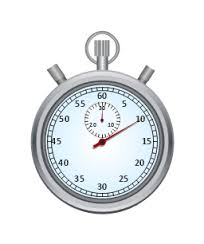
In the laboratory time is measured by using the stopwatch. Stop watches are used for timing laboratory experiments. The stop watches may be mechanical or digital. The digital stop watches are more accurate than mechanical stop watches.
Derived quantities
Derived Quantities
Explain derived quantities
Derived quantities are physical quantities which are derived from the fundamental quantities. Examples are volume, density, power, work, energy, weight, frequency etc.
The S.I Units of Derived Quantities
State the S.I. units of derived quantities
Derived quantities are the quantities obtained from the fundamental quantities. Therefore, the SI units of the derived quantities can be obtained by either multiplying or dividing the units of the respective fundamental quantities. However, some derived quantities have SI units with special names such as Pascal for pressure, Volt for potential difference, Joule for energy, Newton for force and so on.
For example, speed is the derived quantity obtained by dividing distance (length) to time.
That is,
The SI units of speed will thus be metre per second or m/s.
The table below shows some of derived units and their SI units.
| A derived quantity | SI unit | Unit symbol |
| Area | Square metre | m2 |
| Volume | Cubic metre | m3 |
| Density | Kilogram per cubic metre | kg/m3 |
| Pressure | Pascal or Newton per square metre | Pa or N/m2 |
| Acceleration | Metre per second squared | m/s2 |
| Energy, work | Joule | J |
| Power | Watt | W |
Basic Apparatus/equipment's and their uses
Basic Apparatus/Equipments Used for Measurement
Describe basic apparatus/equipments used for measurement
Several experiments are carried out in the physics laboratory by physicist. The experiments involve measurements which are to be done by using proper instruments. Some of the common measurements in the laboratory are the measurements of volume, weight and density.
Volume
Volume is the amount of space occupied by a substance. The SI unit is cubic meter (mˆ3).Other units used are cubic centimetre (cmˆ3) and litre(l).
Instruments used to measure the volume of liquids:
Measuring cylinder-used for measuring or pouring out various liquids.

Measuring flask and pipette are used for getting fixed pre-determined volume.
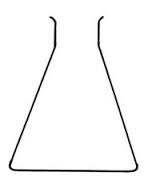
Flask
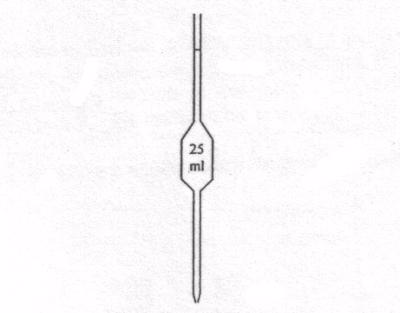
Pipette
Burette-used to deliver any required volume up to its total capacity.

How to read volume measuring instruments(precautions).
Readings are always taken at the level of the bottom of the meniscus or curved surface of the liquid. Mercury is an exception as its meniscus curves downwards.
Care should be taken to place the eye correctly to avoid parallax errors. When taking readings, the pipette and burette must be upright and the cylinder and flask must stand on a horizontal bench otherwise errors may arise from tilting.
Measuring volume of irregular objects.
The volume of an irregular solid can be determined by measuring the volume of water displaced in a measuring cylinder directly or with the aid of an overflow eureka can.
Activity 1
Experiment
Aim: To measure the volume of an irregular object.
Methods
By using a measuring cylinder directly
Materials and apparatus: Irregular object eg; stone, thread, measuring cylinder, eureka can and water.
Procedures
- Poor a known volume of water in a burette(V1)
- Tie a stone with a thread.
- Immerse the tied stone in water holding the thread and record the volume (V2)
- Make sure the stone is totally immersed in water.
Results
- Volume before introducing solid = V1
- Volume after introducing solid = V2
- Volume of irregular solid(V3) = V2 – V1
By using the eureka can
Procedureto follow:
- Poor water into eureka can up to its spout
- Immerse a well tied stone in water completely
- Collect the overflowed water in the water.
- Use a measuring cylinder to determine the volume of water collected
Observation
- When a stone was introduced in an overflow can, water overflowed to the measuring cylinder.
- The volume of water collected is equal to the volume of irregular object(stone)
Weight
Weight is measured by using an instrument known as spring balance. The object to be measured is attached/hanged by a rope to a hook of the spring balance. The pointer will move according to the weight of the object. The weight of the object is now determined by reading from the scale of the spring balance. the spring balance measures the weight in Newtons.
The spring balance

Spring balance
Sources of Errors in Measurement
Identify sources of errors in measurement
Measurements in physics are not all perfect. The measured values are found to diverge from the true value at least to some amount. Hence, it is difficult to obtain exact value of any quantity through measurement. The difference between measured value and the true value is known aserror.
Causes of errors;
- Inappropriate way of using an instrument
- Fault in an equipment
- Wrong positioning when taking readings
- Dusts and rust caused by poor storage of instruments
Types of errors;
Random errors – they are caused by unknown causes. These causes may result from; -
- Poor observation when taking readings or poor judgement when reading the scale of the measuring instrument
- Changes in the environment such as temperature changes, wind or fluctuation of electrical power.
Systematic errors – they are caused by known causes making the measured values to be consistently too high or too low from the true value. Systematic errors may result from; -
- Using a poorly calibrated instrument in which the scale is non- uniform.
- Wrong position when taking readings from the instrument. This is known as parallax.
- Fault in the instrument due to poor storage or handling of the instrument.
- Zero error where by a pointer does not point exactly at a zero mark when the instrument is not in use.
- The use of wrong formula during experiment and data analysis.
Methods of minimizing errors.
It is difficult to eliminate errors but there are methods of minimizing them. Some errors can be minimized when during the experiment while others are minimized by mathematical procedures on the data obtained.
The following are the commonly used methods of minimizing errors; -
- It is not easy to control the causes of the random errors therefore random errors are minimized by calculating the mean/average of the measured values. The mean value is always close to the true value.
- Systematic errors can be minimized by using a proper calibrated instrument, keeping the instruments in good order and using proper formula.
- Zero error can be minimized by adjusting a pointer or by adding or subtracting a number with respect to position of the pointer before the beginning of the experiment.
- Parallax can be controlled by taking the readings positioning the eye perpendicular to the
See the images below;

Controlling of parallax
Density and Relative Density
The Concept of Density of a Substance and its S.I Unit
Explain the concept of density of a substance and its S.I unit
Density is defined as the ratio of mass of a substance to its volume. It is obtained by dividing mass of the substance to its volume. Therefore, density is simply mass per unit volume.
The following formula is used to calculate density of the substance,
_1524032395365.png)
The S.I unit of density is Kilogram per cubic metres (kg/m3). The other unit for density is gram per cubic centimetres (g/cm3) where by,
1kg/m3 = 1000 g/cm3
Example 1
1. A metal of 100 cm3 was measured in a beam balance and the reading was 8900 g. What is the density of the metal?
To solve this simple example, you need to know what information have been given. You have been give volume v= 100 cm3 and mass m =8900 g.
From the formula
_1524032395365.png)
Substituting values in the equation

Therefore, density of the metal is 8.9 g/cm3.
Example 2
A 3kg object has a volume of 0.05 m3. Find the density of the object.
You have been provided with mass m = 3kg and volume v = 0.053
From the formula,
_1524032395365.png)
Substituting values in the equation

Therefore, density of the object is 60 kg/m3.
The Density of Regular and Irregular Solids
Determine the density of regular and irregular solids
A regular solid is the one with a definite shape such as squares, spheres and cylinders. Density of regular solids can be found through the following steps;-
- Measure the mass by using beam balance or digital balance.
- Measure the length or radius of the object by using vernier caliper, ruler or micrometer screw gauge depending on the shape and size of the object.
- Obtain the volume of the object by using a suitable mathematical formula.
- Use the mass and volume obtained to calculate the density of the solid.
Activity 2
Find the density of the following rectangular block.

Procedures; -
- Place the object on the digital balance or beam balance to obtain its mass m.
- Volume of the rectangular block is obtained by using the formulav = l x w x h
- Obtain the density of the block.
Discussion.
Density of the rectangular block can be obtained through calculations by using the mathematical formula
_1524032395365.png)
Irregular solids do not have normal shapes such as stones. Density of irregular solids can be found through the following steps;
- Measure the mass of the object by using beam balance or digital balance.
- Use the measuring cylinder to measure the volume of the object by displacement of water method. In this method, a measuring cylinder is filled with water at a certain level. The object is placed in the measuring cylinder and the new level of water is recorded. The difference in levels of water is equal to the volume of the object.
- Density is then obtained by dividing the volume of the object by its mass.
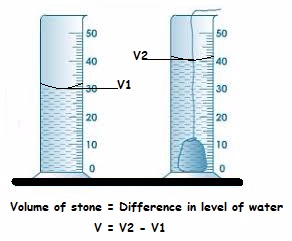
Displacement of water method
The Density of a Liquid
Determine the density of a liquid
Density of liquids can simply be obtained by using a burette or measuring cylinder, beaker and a digital balance. The following steps can be followed;-
- Measure the mass of the empty beaker and record is as M1
- Pour some amount of the liquid in the beaker and measure the mass M2
- Then the mass of the liquid M is M2 - M1
- Take the liquid from the beaker and measure its volume by measuring cylinder or burette. Record the volume as V.Then the density of the liquid can be obtained as

Alternatively,

Activity 3
Experiment.
Aim: To determine density of liquids using a burette.
Materials and apparatus: Burette, beaker, beam balance and kerosene.
Procedures
- Record the mass of the empty beaker m₁ using a beam balance.
- Pour the known volume of kerosene into the beaker by using bur rete, V.
- Record the mass of the beaker and kerosene m₂.
Results

Example 3
In an experiment to determine the density of liquid, Zawadi a form I student obtained the following Mass of beaker is 400g, Mass of beaker and liquid is 500g and volume of liquid, V = 250 cm3. Find the density of the liquid.
Data given
- Mass of beaker, M1 = 400g
- Mass of beaker and liquid, M2 = 500g
- Mass of liquid, M = 500–400 = 100g
- Volume of liquid, V = 250 cm3
- Density of liquid, ρ = ?
From the formula

Therefore, the density of the liquid is 0.4 g/cm3.
Definition of the Relative Density of a Substance
Define the relative density of a substance
The Relative density of a substance is the ratio of its density to the density of water.The density of water has the density of approximately 1.0g/cm³ or 1000kg/m³.

Note:Since the density of pure water is 1g/cm³, the RD of a substance will be represented by the same number as its density in g/cm³.RD has no units as its ratio of same quantities.
Applications of Density and Relative Density in Real Life
Interpret applications of density and relative density in real life
Application of RD in real life.
- It is the key factor which is considered during the design of various structures and equipment. Eg. ships and planes.
- Density is considered during the selection of materials.
- Density is also considered during the design of equipment used in swimming.

